Tuesday, September 26, 2017

Rogue One: A Star Wars Story's Cassian Andor

 Since I couldn't leave just Jyn to get those Death Star plans by herself, I went ahead an picked up the matching Cassian Andor from the same figure line. This Cassian is in his initial Jedha/Eadu appearance with blue parka and puffy pants. 

INITIAL FIGURE

Right away his face deco is an improvement from the Jyn figure, as this head looks much closer to Diego Luna in appearance. Still, it's basically the "cartoon" version of his face, and leaves a lot to be desired.

DISASSEMBLY AND PRIMING


I acetone-d off his face deco but kept the hair. Since I wasn't expecting to do minute detailing for the hair I didn't mind having a slighty thicker layer there. The more paint for the primer to hold on to the better.

I unintentionally de-glued the much softer fur collar around his neck while I was trying to pop the head off with hot air. This turned out to be a good thing it would've made it much trickier and laborious to try and not paint the neck fur while detailing the blue jacket.

Since Cassian's head isn't terribly large, I went ahead and did a single coat of white primer over the whole thing, leaving just a tinge of the original coloring underneath. This step turned out to be extremely important as I will explain when I get to matte finishing this thing. I also primed his Blaster in an effort to not repeat the same mistakes from Jyn's Blaster (ironically running into a whole new problem, also related to the matte finishing.)

BASE COLORS AND DETAILS

Fortunately, this figure wasn't missing too much from his original design. I added silver to his belt buckle, pocket grenades(?) and wrist communicator. I'm glad they only showed part of his sleeve buttons as in his outfit it's a whole mess of colors. I already added some brown shoe polish staining to his pants and boots at this stage.

SHADOWING AND HIGHLIGHTS


 I added the shadowing effect here with Cosplay Chris' patented shoe polish technique. A good coating of Kiwi Scuff Cover then rubbed away with cheap napkins. You can already see how much detail came into view after this application. I especially love how the gloves came out; very gritty and seen some better days.


The shoe polish trick did however leave the parka far darker than it ever appeared on screen, so to 'return' the color, I used Americana brand True Blue and did a pass of 'semi-dry' brushing, focusing on the raised and broad areas of the parka. It did a good job of bringing life back into the hue.

DIRT AND WEAR


Same with Jyn, I dry-brushed a yellow-brown all over this thing, with focus on boots and elbows. Definitely looked like this guy's been walking across a desert.

FUR AND HAIR

For Cassian's hair I did a pass of a darker brown and painted in the grooves. The fur collar was a bit trickier as in the movie, it's very much wolf/husky fur in appearance: going from a lighter color internally to a darker color as it goes out. A layer of brown shoe polish then that same darker brown on the hair was dry brushed onto the fur tips. Not perfectly looking, but the detail in the fur looks so much more obvious now.

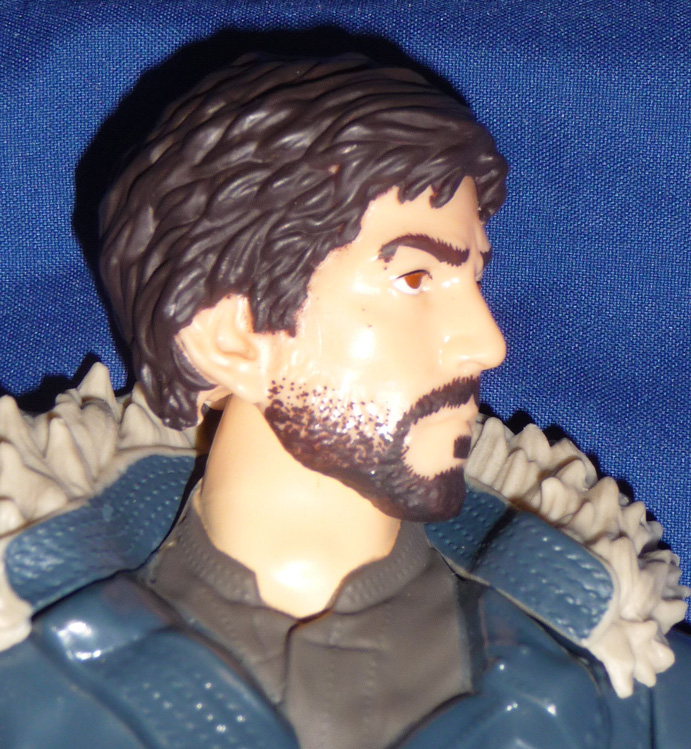
Also, at this stage I added the 'blush' wash to Cassian's face, except a good hint darker than Jyn's. I particularly love what this wash did for the ears as they look eerily real after this step.

FACE DETAIL


Here I laid down the flesh pink on the eyes and lips, then threw on the gloss white eyeballs.

 Using that same darker brown from before, I did light strokes for the eyebrows and beard, with dry brushing on the stubble. I probably came down a little too heavy on the eyebrows, but the shape was dead on. For his irises I used FolkArt Metallic Inca Gold. I kept the 'slightly to the left' gaze the original deco had as Diego Luna looks in that direction in all of his promo shots.

 For his hair shine I used FolkArt Metallic Bronze and dry brushed quite liberally.

FINISHING TOUCHES

I didn't get it on photo, but I did add the same lip gap wash, except this time adding a light coat afterwards; you can see his lips are a little too 'hot pink' before this step.


 This is after a basic coat of Krylon Matte finisher. Now here's where I ran into some issues, old and new:
  • His fur collar is a very soft rubbery +plastic, highly plasticized PVC I believe. It did not hold onto this finisher AT ALL. But because the finisher is Acetone based, it pretty much melted any 'raw' paint it touched. So as you'll see it's still in this extremely glossy state that, unfortunately, took a small chunk of hair paint with it right after I took these pictures.
  •  As mentioned earlier, a similar quirk ate the paint on his Blaster's grip. His fists are also PVC; they didn't get too glossy, but definitely kept the finisher 'free', completely melting the acrylic off that grip and revealing the white primer underneath.
So new rule from now on: ALL PVC parts need to be primed. No exception. His head is also PVC but did not suffer the same overgloss/leaching effect, so I'm gonna stick with this rule from here on out.

COMPLETED FIGURE


So here is Cassian Andor in his mostly-painted glory. I think it looks pretty darn good. Very happy with how the face came out, and I'm also happy that I did the highlight work on the parka, as that would've looked REALLY drab without it. I didn't bother gluing back on the parka fur collar since I didn't want them to do anymore damage to the hair (thankfully really hard to see from these pictures). I might not ever actually glue it back, as it takes no work to make it snug for display/picture purposes.

 Here are Cassian and Jyn side by side, cautiously tracking Saw Gerrera's henchmen. And yes, Jyn is holding that Blaster all wrong; I didn't want to damage the black paint on it anymore than I already have so I kept the grip loose. Although I think I will just go ahead and use my enamel paint markers on both of their Blasters.

BEFORE AND AFTER

And lastly, here are the before and after shots of this figure. Again, they put in a considerable amount of work into this mold but gets sidelined as 'kids toys' because of lack of paint. I didn't even know he had those sleeve buttons until I had to look them up from screengrabs.

Can't say enough how happy I am with the turnout of the face; from far away enough it just looks dead on Diego Luna. Obviously there's no way I can expect Hot Toys level of detail but for such an inexpensive figure there was a lot of realism that was just simply hidden by lame tampography.

I have more Star Wars coming down the pipe, as well as some tasty Justice League figures just begging to be repainted. Until next time!
-A.K.

Friday, September 22, 2017

Jyn Erso - My first real attempt at custom figure painting


After watching a few too many Cosplay Chris videos about his custom figures and props, I finally managed to push myself into actually getting a custom piece done. I found a 12 inch Jyn Erso "not Titan Hero" version on clearance at a local Target and decided she was a worthy experiment.

For those that don't know, the major companies that make toys of actual movie stars have been using laser 3D scanning on their faces for a good while now, but they NEVER look like them on the final product. The primary reason being the paint budget. So even though they're physically accurate, they rarely look like the person they're based off of. I could tell right away this Jyn was victim of this tragedy. Only recently did Hasbro and Mattel finally get a decent format that worked out an okay looking paint-to-accuracy balance.

STEP 1:

Unfortunately I already had done things by the time I remembered to start taking pictures of the process. As you can see the base figure is pretty detailed but missing a metric butt-ton of color. They didn't even bother base coloring the outer vest and boots.

 I already popped the head off and wiped the face and hair out with acetone. Fortunately her whole head and shemagh are a softer plastic (polypropylene I believe) and cleaned up nicely.


 I sanded down the back and boots with a very fine grit. I didn't bother trying to prime these parts as I didn't really expect this figure to see 'action' when I was done. Since this was purely experimental I didn't particularly care about the wear resistance of the paint.

STEP 2:

 I've been collecting a pretty big library of hobby acrylics originally for Gunpla use since they come in tons of shades. Just about everybody knocks on these budget paints but I'm big on priming and finishing anyway, so I feel like shelling out for quality (ie: expensive) acrylics don't really make for a significant difference in my process.The gain isn't terribly much for the amount I would pay for.


I put down the base colors for the vest and boots, about 4 coats each. You can see I made some overbrushing errors but I fixed that easily with Rubbing Alcohol. After the base brown I added the base colors for the little details; silver on the buckles and pocket grenade thing, and black straps. It already looks better without any shading effects.

STEP 3:


So straight up taking Cosplay Chris' shoe polish technique, I used some Kiwi Scuff Cover in Black and went to town on the head. Already you can see the sculpt details that had been there the whole time but impossible to see because of the plastic texture.


I used the same shoe polish on the pants and shirt, but the effect is much more subdued.


This is the Blaster after shoe polish on top of a black base. It looked pretty good at this step, but regrettably I should've definitely primed this before I worked on it at all (explained at the end)

STEP 4:


I then used Kiwi Scuff Cover, in Brown this time, for the jacket, vest, gloves, and boots. Didn't quite sink into the crevasses as much as I expected, but it had this wonderful effect on the brown paint, making it look much more like tattered leather/suede.


 I then did a dry brushing of the brown-yellow Jedha sand just about all over, with a lot of emphasis on the knees, elbows, and shemagh ends.


Close ups of the dry brushing on the boots and pants. I went overboard with the boots since they have been walking the Jedha desert, and also on the edges of the blaster holster, giving them a nice, worn leather touch.


STEP 5:


Unfortunately it's hard to tell in this shot but there is a very subtle "blush" wash that I did on the face; I used a lot of watered down brushing then immediately wiped it with paper towel.. The idea is to get this dark pink shade into the imperfections of the flesh base, so it looks like there's actual blood flow getting into her face. The wash also seeps into the nostrils and eyelids and it makes a HUGE difference.

After the blush wash I went on to the base colors. The white I used for the eyeballs are specifically Gloss finish, so their sheen is completely different form the rest of the Satin finish face. Her irises are Folk Art brand Metallic Emerald. I accidentally nicked some parts with the paper towel so my corrections are rather obvious. Again, primers, very important thing to add people.


I did another wash, this time using a brown-red mix, focusing on where creases appear on the face: below the eyebrows, behind the nostrils, etc. Again, same technique: water heavy strokes, then dabbed clean with paper towel.

Lastly was the eyelashes. In all of my references Felicity Jones goes for a very heavy lower lid shadowing, so I tried to go for a 'heavy but not too heavy' look for the lower lashes. It didn't quite work exactly as I expected, but I'm happy with it. For the finishing touches, I did a very light coat of the Folk Art Metallic Antique Gold to give it the silky shine real hair has. I also did a thinned out dark red stroke on the lip gap to make the lips really pop. 

STEP 8:


 For the finishing coat I used an old can of Krylon Matte I had from a project years ago. Now here's where I royally screwed up; instead of testing the spray can on say, a random object that WASN'T my project, I sprayed directly on to the back of the figure. It came down way too heavy and ended up erasing some of the dry brushing I put on the vest. Fortunately, it's on the spots where the shebagh was covering anyway, so unless I pointed it out to you, you'd never guess it was messed up. But remember people, test your spray cans on non-important items/areas.

Weirdly her sleeves became way shinier after using the MATTE finish; no solid explanation but I think it has to do with the way the PVC (PP?) reacted to the finish medium.

FINAL PRODUCT


 This is the now completed Jyn Erso. Apologies for the unflattering lighting as I don't have a white photo booth set up at all. Overall very happy with the turnout, considering I had no practice at all in any of the 'new' techniques I was using. My biggest regret though was not adding primer to the blaster. A lot of the handle black peeled off immediately after testing how the figure held it. Lesson learned.

Here are a couple of before and after shots to really show how much you can improve a figure with just the right paint touches. Again, I made absolutely no modifications to figure at all; no carving, puttying, nothing:


I will say the end product looks way more like Elizabeth Olsen than Felicity Jones.

CLOSING


I really hope this little walkthrough demonstrates how much work actually gets put into these darned figures but just gets lost because of paint restrictions. If anything I pointed out helps out someone out there I'm glad. Until the next project!
-A.K.